Showing posts with label ikandies. Show all posts

Tuesday, October 21, 2014

New Tool - Quick Start Peyote Card

iKandies was able to attend Beadfest Philliadelphia this year and we had a ball!  Checking out all the vendors' offerings, attending classes, looking at new products - it was a busy three days. While browsing the show floor, iKandies was drawn to a demonstration of Deb Moffett-Hall's Quick Start Peyote Cards.   If you've ever worked with Peyote stitch you know why this would catch our eyes.

Several weeks prior to the show we started to make Fusion Bead's "Harlequin Bracelet" but had difficulty getting it going.  It's that pesky Peyote stitch! The Quick Start Peyote Card eliminates the confusion that we often have while stringing the first three rows.

The cards come in several sizes that match the size seed bead to be used - 15, 11, 8, and 6.  iKandies purchased the Combo pack so we could try it out with any size seed bead.

The cards are made of "durable laminated material".  They look like they would hold up well, but we were also told we could use them as templates and make new cards should we need them.

Our first attempt at using the card with size 11 beads went well.  As the beads are strung, they fall into small "slots" that are formed when the cards are folded.  This keeps the beads evenly spaced and makes for quick "pickup" when adding the next row.    Detailed directions and diagrams are provided and they are easy to follow.  Instructions are given for even count and odd count peyote.

iKandies can see where this will be a huge help in getting this bracelet project off the ground. We'll post the finished project and the rest of our review at a future date.


Monday, October 20, 2014

iKandies has a new website!

New iKandies.com website has launched!


iKandies has just released a new website!  It's still located at www.ikandies.com, only the webhost has changed.  What's new about this website?

Using Duda's Responsive Web Design, iKandies has created a website to look and react correctly on any device used to access it, whether it be a desktop, a tablet or a smartphone. Responsive web design does more than show the same content on a different sized screen. It adds functionality and removes unnecessary content based on the viewing device.

Why are we excited about the new website?  More and more people are "going mobile" by using smartphones and tablets.  Not only are they handy to carry but also easy to use.  Our responsive site makes a user's mobile website experience much easier!  


Here's a sample of how the pages may look depending on your device.    On the Smartphone view on the left, the menu is shifted to the upper right corner and content is lined up vertically to fit within the screen.


The Tablet view on the right more closely resembles the view seen when navigating the site with a desktop computer. 


Whether you choose to view the site with a desktop computer, Smartphone or Tablet, the same functionality exists for all devices.


The site is also platform friendly. This means that it is viewable on an Windows, Apple or Android device.

Try it out today.  Click on the link - iKandies Unique Custom Jewelry - to view our new website and let us know what you think!


Monday, November 25, 2013

These Boots Were Made For More Than Dancin !

A recent search by iKandies on Pinterest for interesting shoe designs resulted in this page of Shoe Decorating Designs http://www.pinterest.com/linzifer/shoe-decorating-ideas/.  Some of these are quite unusual  You can decide if you like them or not, but regardless of your decision, we're sure you'll agree adding "eye candy" to shoes and boots is definitely the "in" thing to do!

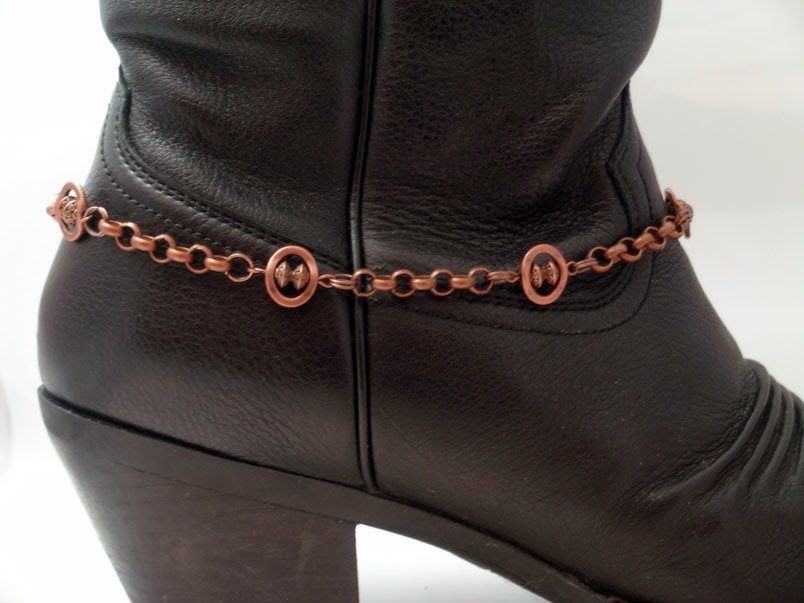
iKandies noticed the trend and decided to add a few Boot Bracelets to our line of jewelry to test the waters.  We're happy to report that they've been a popular item: not only showing up at the top of our Search list on our iKandies Etsy Site site, but we've also sold several of our designs.  Although they may be simple designs, they're very flexible because they can be worn on any number of boot styles. 

Our designs range from simple copper chain


..to more ornate chain with charms


 ... to a leather buckled strap with Swarovski crystal accents


We'll soon be enlarging our boot bracelet offerings by adding a few fun designs. So no matter what your preference, you're sure to find something to make those ordinary boots do more than dance!

Tuesday, October 15, 2013

iKandies and Glass Fusing!

iKandies tried something new over the weekend: glass fusing!  A local glass studio, Akron Glass Works, began the annual offering of glass fusing and glass blowing workshops.  At the last minute, iKandies decided to sign up for a glass fusing class, and we're glad we did!

Pistol Grip Glass Cutter
We thought glass fusing involved using a torch so we were surprised to learn the process is done in a kiln.  Layers of glass are heated to a temperature from 1100 to 1700 degrees and as the glass reaches a molten state, the pieces are fused together. Since not all glass expands or contracts at the same rate, the glass must be compatible. We learned about the coefficient of expansion - COE - or the rate at which glass expands when heated. To prevent the glass from cracking during the cool down process, he COE of the glass being used must be the same. We also learned about some new tools like running pliers - a tool used to break glass by hand along a scored line made on the glass and a pistol grip cutter which is used to score the glass before breaking it into pieces.


Glass pieces, copper foil and tools
Then we discussed patterns, cutting the glass and positioning it on our base piece.  We were shown how to layer the glass and add decorative features such as copper foil, glass frit (crushed glass) and glass stringers (long string like pieces of glass).

Running Pliers used to snap off scored glass


Scoring the glass wasn't hard, but cutting anything other than a simple shape was!  So we stuck with a simple design: a tree made with fall colors.


Positioning the glass

We chose transparent glass so that we could layer copper foil between some of the leaves and the base glass.  Then we applied glue to tack the pieces in place before firing the project in a kiln.  The kiln is a large floor model that is heated to 1480 degrees in order to fuse the glass properly.


Ready for the Kiln


We learned about glass slumping or allowing the glass to heat and then "slump" into a prepared mold while in the kiln.  The molds are made of clay or stainless steel.


The finished product!  


Friday, December 14, 2012

iKandies Adds Licorice to our Jewelry

Licorice?  Well, our name is "iKandies"!  But we don't mean licorice candy.  We're talking about Licorice leather or what is better known as "Regaliz" leather.  This is pronounced "reg-AH-leez" and has been all the rage in Europe.

The Regaliz bracelet component system consists of genuine Greek leather 6mm by 10mm in size and found in a variety of colors. High quality beads, caps and clasps in zinc and pewter are electro plated with 99.9% sterling silver.  Ceramic large hole beads and rubber rings add color and style options to each bracelet.  The nature of these bracelets make them appealing to both men and women.

Seen first at the 2012 Bead and Button Show, iKandies began noticing more and more bead supply stores offering these components.  So we tried our hand at making a woman's and a man's bracelet and here's the results:

Men's Regaliz Leather Bracelet
Women's Regaliz Flat Leather Bracelet
The Regaliz system includes ceramic beads, rubber rings and other pieces to adorn and finish your leather bracelet creation. We decided to create sterling silver metal slides for the Men's bracelet.  The sterling pieces were textured, annealed and then formed into slides that would fit on the leather cord.   For the woman's bracelet, we textured, annealed and oxidized a copper component to attach to two strands of flat Italian leather.  A Swarovski flat back crystal was glued to the copper piece, creating an eye catching focal point for this bracelet. 

We were able to attain quite a bit of leather from our supplier, Primative Earth Beads, so we'll be making more of these luscious bracelets!  Check out our website for these and other fine pieces of jewelry.

Tuesday, November 20, 2012

iKandies Up Cycles Data Cartridge Storage Boxes

By day I am a network administrator for a small company. Up until a few months ago our critical computer systems were automatically backed up during the evening to an HP Ultrium data tape drive.  Recently, we replaced this system with a new process that no longer required data cartridges.  What to do with the cartridges and their plastic storage boxes?

While the tapes must be destroyed, I was hoping to find another use for the storage boxes. These boxes are approximately 4 1/4 inches square, made of a sturdy plastic and have a flip top.  While many jewelry packaging options are pretty, they are not always practical for shipping or transporting delicate jewelry items. So iKandies decided to put these boxes to use as packaging for our jewelry items.

We setup an account with Moo.com and created labels that featured pictures of many of our jewelry items.  These images, along with information about iKandies Unique Custom Jewelry, were combined to create a variety of labels that can be fixed to the top of the plastic storage boxes. Not only do we have something to decorate the boxes, but also another way to advertise our business.

To use the box we simply pop up the lid, place a tissue paper wrapped jewelry piece inside and click the lid closed.  Each jewelry piece is protected inside its cocoon, nestled in a cute, reusable plastic box!

Look for our new packaging the next time you order from iKandies Unique Custom Jewelry.

Finished Stamping Project

The stamping project referred to in iKandies last blog post has been finished!   We had just finished stamping the diamond shaped copper pendant and was preparing it for oxidation.  After dipping it into a bath of liver of sulfur, the pendant was polished  front and back to remove most of the oxidized affect.  The black coloring that was left enhanced the stamping design on the pendant.  For the next step  fine copper wire was laced through holes that were punched along the sides of the pendant.  The wire was woven in a random pattern back and forth along each edge, and Swarovski crystals, small Czech glass beads and copper disks were added to the wire during the weaving process. Several layers of wire and beads were added to fill in the design.


Finally, the neck of the pendant was rolled towards the back to form a bail so that it could be attached to an antique copper chain.  Here's the final result.  Not too bad for the first stamping project!


This was fun although we have to admit, it takes some practice to get the stamped design straight.  Our next project will tackle letter stamping.

Tuesday, November 6, 2012

iKandies Gets to Play With Hammers!

Recently, iKandies has been delving into the world of sheet metal and hammers.  A new book by Lisa Niven Kelly, "Stamped Metal Jewelry: Creative Techniques and Designs for Making Custom Jewelry" caught our eye because of the unique designs she had included that used stamping techniques.  We watched the DVD tutorial which outlined the steps needed to make clear stamped designs on metal.  She also included tips such as her "tilt n' tap" method of ensuring that a great impression is made on your metal.   Another helpful tip that she shared is lightly polishing the surface of the metal to be stamped.  This causes a reflection on the metal and it then becomes easier to see where to place your stamp.  This is a great help for lining up letters if you are stamping a word or phrase on your metal!

We checked our supplies and found some of the items we needed at Bead Fest Philadelphia and others online.  Beaducation, P. J. Tools and Fusion Beads are just a few of the places to find great stamps.  Not only will you see a variety of letter designs, but many design stamps representing shapes and images of people, animals and other items that will make your designs personal.


Aren't these the cutest stamps!
Next, we selected a project from Lisa's book:


We practiced stamping several designs, utilizing the "tilt n' tap" method.  It works great, by the way!

Then we started with our design:  cutting the copper sheet metal into a pendant shape, filing the edges, taping the shape to a bench block and filling the front with our chosen design.  Here's the project after stamping is complete and holes have been punched along the edges.  Now we're ready for wire wrapping the edge!  But first, we'll need to give the pendant and the wire a bath in Liver of Sulfur. This will give the piece an "antiqued" look.  Then the pendant and wire will be lightly polished to remove excess oxidation from the design and refine the "antiqued" look.

Silver Black can be used in place of Liver of Sulfur on sterling silver, brass and nickle.  It can be applied with a Q-tip just to the area to be darkened (the words stamped onto a charm, for example) for immediate results. A Pro Polish pad can be used to polish off excess black.

Please check back on this site for our continuation blog of this project as we oxidize, wire wrap the edge of the pendant, make the bail and attach the pendant to a chain.

Thursday, September 20, 2012

We've been beading for over eight years and have always found it a challenge to find high quality supplies at a reasonable price.  We have yet to locate a decent online bead store directory, so many hours have been spent scouring websites for the products you just can't get at a local bead store. For example here's a picture of a recent purchase made from Rio Grande.  Due to our increased interest in copper sheet and copper wire, we decided to purchase larger quantities of both so that we would not run out in the middle of a project. By larger quantities, we mean 1# spools of copper wire in 14 through 20 gauges. We also purchased 2 sheets of 6" x 12" copper sheet.


iKandies has found that purchasing metals from a company like Rio Grande who specializes in this type of product results in higher quality and better prices.  Many online bead sites specialize in large amounts and varieties of gemstones, crystals, glass, and findings, and offer sheet metal and copper wire in smaller amounts ( 3" x 3" sheets or 10 to 20' wire coils).  Small pieces of metal or lengths of wire are fine for the occasional metal accent piece but these items come at a cost.  The price break you get buying in larger amounts really pays off. 

And if you're really interested in getting a "price break" on copper, hunt around for unused or left over copper wire from building sites.  The next photo shows the copper wire (about 26 gauge) iKandies inherited  from a do-it-yourself heating and air conditioning project done by a relative.  We have used this wire for many, many projects, including the wire wrapped Rivoli pendant necklace shown in the picture.


Copper sheet and wire are easy to work with and make beautiful jewelry pieces.  Pure copper can be textured, painted, enameled, oxidized, treated with a patina or torch fired with gorgeous colorful results. If you haven't worked with copper, branch out and try it for your next project.  You'll be pleasantly surprised with the results.

Thursday, December 15, 2011

Get Ready for 2012 Colors!

Here at iKandies we LOVE color!  So we've consulted the Pantone color website to see what colors are in store for 2012.  We found that the color of the year is Tangerine Tango. 

This color is described on Pantone's website as a " a spirited reddish orange" which provides "the energy boost we need to recharge and move forward."

Orange has become a more popular color in fashion over the past few years, not only in clothing but also in cosmetics.  Tangerine Tango can be used as a complementary color for blue or green eyes. 

Pantone's color report for Spring 2012 includes Tangerine Tango, Solar Power, Cabaret, Bellflower, and Sodalite Blue.  These neon colors mix with the soft pastel shades of Cockatoo, Sweet Lilac, Starfish, Driftwood and Margarita.  You can see all of these colors on Pantone's website.

Pantone is known as the originator of a color system that identifies, matches and communicates colors to solve problems that often occur when producing accurate color matches.  Pantone is known world wide for their color matching system not only in the fashion industry but also in digital technology.

iKandies has been inspired by it's investigation of Pantone's color system.  While browsing a bead supplier's website recently, we found a Czech glass and seed bead mix that includes colors similar to Tangerine Tango.  The order has been placed with Auntie's Beads and we're anxiously awaiting delivery so we can begin creating our first design for spring!  


Tell us what you think of this bead mix!


Tuesday, December 6, 2011

Button, Button Who Has the Button?

Acrylic Peach Button Bracelet
 One of iKandies more recent sales was a unique button bracelet.

 At the Tucson Gem & Mineral Show early in 2011, I came across a vendor selling all the pieces needed to make a button bracelet. 

This included a base metal bracelet blank base, mother of pearl buttons in creams and greys and metal buttons. 

The pearl and metal buttons were layered in different ways on the bracelet base and these designs made quite a statement. I was inspired by the idea but wanted to brighten it up a bit. So as I was designing my take on a button bracelet, I remembered the acrylic flowers I had used in a necklace design and decided to incorporate them into my bracelet.

The finishing touch was to add some beadwork the middle of each flower or button component.  And Viola!  My Acrylic Peach Button Bracelet and Acrylic Burgundy Button Bracelet were born!
Acrylic Burgundy Button Bracelet

 For my next button project, I thought I'd try to create a design using these gorgeous Czech glass buttons...
Glass buttons from vintage molds

Monday, November 28, 2011

BeadandButton Show Lets Us Play With Fire

I remember as a little girl being fascinated by the glass on display in a southern Ohio glass factory. I've always been drawn to glass, particularly glass artwork. The beautiful glass beads used in jewelry design was one of the things that made me want to attempt jewelry making. When an opportunity came to learn lampworking, I jumped on it. One of the venues the iKandies team has used to learn new techniques like lampworking has been by attending the annual Bead&Button Show in Milwaukee, Wisconsin. Members of the iKandies team have been attending for four years and we thought we would share one of our classes with you in this episode of iKandiesJewels.

The class we attending was a beginning class in lampwork. According to Wikipedia, the definition of "lampworking" is:
Lampworking is a type of glass work that uses a gas fueled torch to melt rods and tubes of clear and colored glass. Once in a molten state, the glass is formed by blowing and shaping with tools and hand movements. It is also known as flame working or torch working, as the modern practice no longer uses oil-fueled lamps.

Our instructor provided us with the tools we needed, as the photo shows.  This included a hot head torch, metal table surface, marver, mandrels, fiberglass blanket and glass rods, to name a few.

In the next three pictures we see Jill, Debi and I demonstrating the techniques we learned to melt the end of the glass rods, wrap them around a mandrel, and shape them into round, oblong or square beads.

We also learned to layer colors of glass and add dichroic glass pieces to add depth and sparkle to the bead.

The beads can be cooled in a fiberglass blanket, but in order to reduce chipping and breaking, they must be annealed in a kiln.

Although creating beautiful pieces of lampwork glass can't be learned in a day, we benefited from the learning experience.   Our beads were far from the beautiful pieces on display at the BeadandButton Show but we learned alot from the class.  We learned about the properties of glass, how various colors heat at different temperatures, how to work with the hot glass, and even how to fix mistakes!  We truly have a greater appreciation for the artisans who create their beautiful pieces using this technique!


Sunday, November 20, 2011

iKandies- Have us Repair Your Jewelry or Design a Custom Piece for You

The designers at iKandies have had requests to repair jewelry pieces that we have not designed, and we have always been happy to do our best to transform your items back to their original condition.  These repairs have included lengthening necklaces, repairing clasps, restringing, and even redesigning older pieces.  What is involved in these kind of repairs?
First, photos are taken of your item and an inspection is made to ascertain what repairs are needed.  If replacement parts are required, we make a diligent search to find the closest duplicate to the part to be replaced. The item is careful disassembled and laid out on a jewelry mat. In most cases we use Accu-Flex 49 strand Beading Wire or Berkley Fireline braided cord to restring an item.  Sterling silver components are replaced with sterling silver parts while plated metal components are replaced with plated metal parts. Similarly, we replace crystals, glass, pearls, and metal beads with the same type of component.  
If an item is to be redesigned, we will discuss your vision for your piece and answer any questions you have about changes you would like made. 
Amonite and Potato Chip Shell Necklace
If after the initial inspection we find we are unable to repair your jewelry piece, it will be returned to you in the same condition in which it was received.
Prices will be quoted after photos and the inspection have been made and before we proceed with any repairs.  Rates are based on time and materials, and a flat $5.00 rate is added for shipping for most items. Shipping insurance may be added upon request. 

Additionally, we have created beautiful custom pieces that have been requested to match specific outfits or for special occasions. Customers who have sent us photos and asked us to recreate the piece for them are not only pleased with the results but surprised at how well we are able to duplicate the jewelry piece in the photo.

If you would like a quote for first class repairs or a custom jewelry piece designed just for you, please contact iKandies at kkrizzy@hotmail.com.

Monday, October 31, 2011

New Project Accessory Show Challenges Designers


iKandies received an email the other day from one of its suppliers, Rio Grande, and discovered this company was a supporter of the new Lifetime Channel show, Project Accessory.  In this program, 12 designers will compete by creating one-of-a-kind jewelry, bags, shoes, and other accessories.  Rio Grande not only supplies some of the tools shown on each episode but is also offering a design challenge of its own each week that coordinates with each episode in the show.   The first episode on Project Accessory challenged the designers to create an accessory for jeans and a t- shirt by using objects found in a storage unit.  Rio Grande’s take on the challenge was an Asian-inspired, industrial collage belt.  For a look at the finished product and a list of supplies and tools used to make it, click on this link. You can also signup to be notified of Rio Grande's weekly challenge and contests they'll be holding in conjunction with the TV program.

Friday, October 7, 2011

iKandies is blogging again!

Well, it's been a long time since I posted on iKandies Beads on the Block blog. Been working on our website and Etsy site, and boy, did they need a remake!  Our website, iKandies, has been reduced to just a few informational pages.  A sample of our jewelry designs that are for sale appear on the home page but traffic is being redirected to our Etsy site.  The iKandies site provides information about our company, our designers and our shop policies.  We also feature new designs we've added to the Etsy site. 
   Over 60 items are now available for sale on our Etsy site.  We've added newer, more descriptive photos of our designs.  We are featuring a sale at least once a month and are offering special coupons for first time buyers once they make a purchase. 


Abalone and Sterling Necklace
Fall Acrylic Necklace


Here's a sample of two of our newer listings:


We plan to add new items on a regular basis so please visit  iKandies and our Etsy shop today!

Monday, November 29, 2010

About Our Designers... Featuring Debi's Designs

Debi, my sister and one of ikandies designers, was the first to join me in using jewelry design to express our creativity.

Debi is shown here working on her acrylic  "Fall Garden" necklace.

She started creating her own necklaces as accessories for special occasions. Friends commented on her jewelry and so she began beading for others. Many of her necklaces feature gemstones combined with seed beeds or Swarovski crystals. She favors the "chunky" necklace look and says that she's more inspired if she's beading while at the beach, one of her favorite vacation spots!


Her husband created this wonderful tray that transforms her workshop into a portable one.

She has used her love of Swarovski crystals and Vintaj Brass to create several vintage styled necklaces.  Here's one of her favorites:


Debi has attended classes at the Bead and Button show in Milwaukee for the past several years to learn new skills in metal smithing, chain maille and lampworking.

About Our Designers... Jill's Designs

Crochet Hook + Seed Beads = Bead Crochet?

Watermelon Seed Necklace
Crochet with beads?   That's right!  And Jill, one of ikandies' designers and my sister-in-law, has become an expert at it.  She picked up the technique for her "Watermelon Seed Necklace" by watching Karla Shafer of Auntie's Beads demonstrate how to add beads to wire and crochet a simple necklace.  Jill strung Swarovski crystals in greens and pinks on green artistic wire and joined several crocheted stands together to create this piece.

She also learned how to crochet seed beads into a rope-like necklace that gently spirals the length of the rope. Jill used turquoise, black and cream colored seed beads to fashion her "Twisted Turquoise" necklace, shown below:

Twisted Turquoise

Green Wave Bracelet
Jill has found "Karla Cams" on the Auntie's Beads website very helpful in learning other techniques, such as the two-row flat spiral stitch.  She used that to creative this beautiful bracelet in seed beads and crystals:

Jill looks for beads at local stores and various Internet sites but prefers to purchase her beads from Auntie's Beads or Fusion Beads.

Jill has attended the Bead and Button Show in Milwaukee and taken classes in metal working and lampworking.  Here's Jill in her "workshop" dreaming of another project...